The Site editor allows you to design the entire site including the header, footer, and everything in between, with blocks. It gives you greater control over how your site looks.
The Site Editor is only available when you install and activate a Block theme on your site.
How to access the Site editor
To work with the Site editor, you need to use a block theme on your site. A block theme is a theme that uses blocks for all parts of a site, including navigation menus, header, content, and site footer.
All blocks that are available in the WordPress Block editor can be used in the Site editor. A set of blocks called Theme blocks are specifically built for the Site editor.
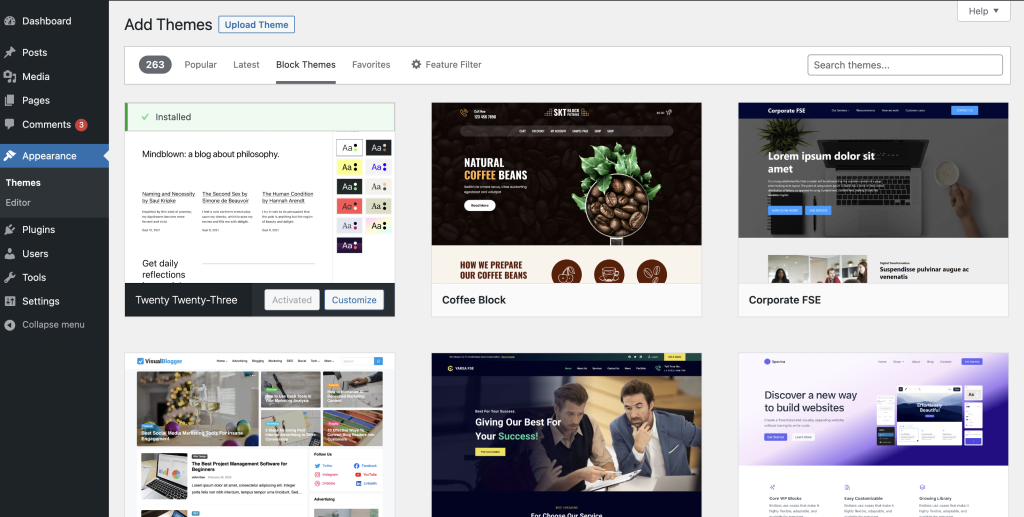
To find block themes, from the WordPress dashboard, go to Appearance > Themes and click Add New. In the Add Themes page, select Block Themes to find the growing list of Block themes in the WordPress theme directory.
Once you install and activate a Block theme on your site, go to Appearance > Editor to open the Site Editor.

Things to do in the Site Editor
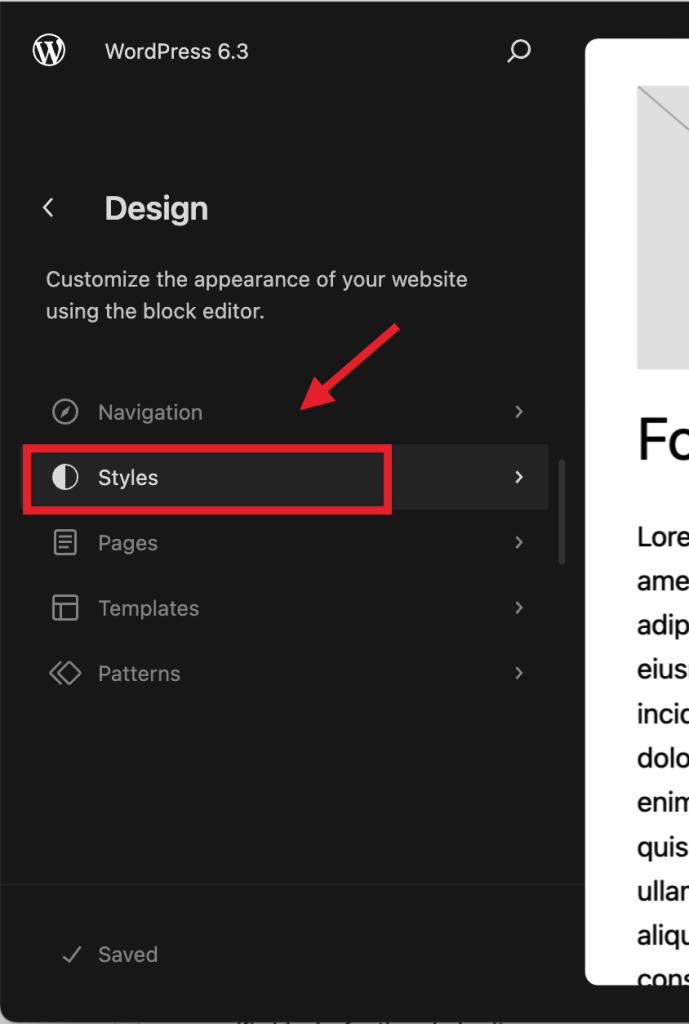
Once you enter the Site Editor, you will see five menu items.
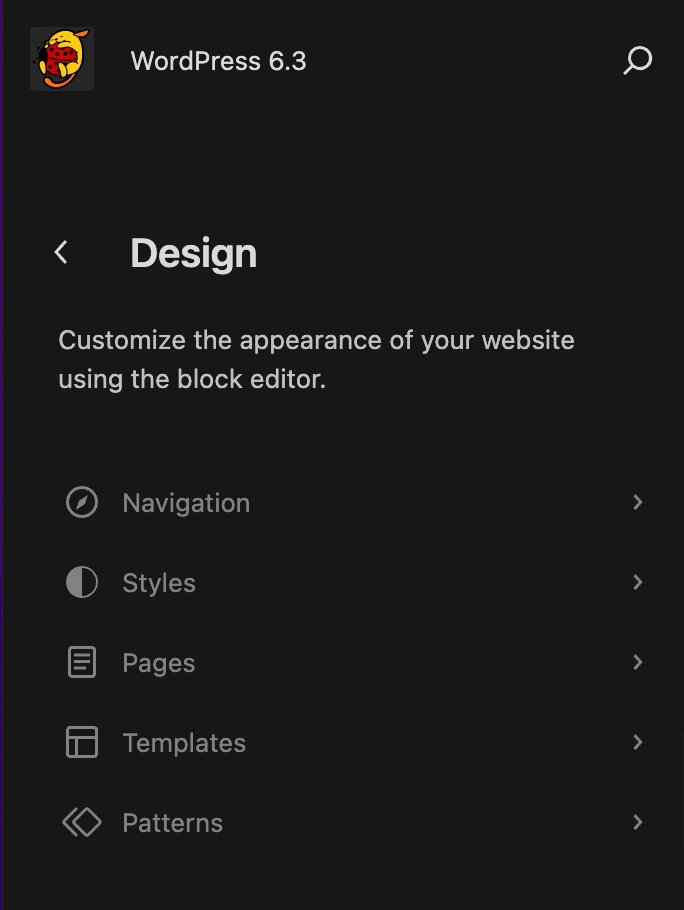
- Navigation: Allows you to browse your menus and make basic changes.
- Styles: Provides a direct access to edit your site’s style variations.
- Pages: You can now edit the content of your pages inside the Site Editor itself.
- Templates: Review the different default layouts for the different sections on your site, as well as custom pages (search results, 404, etc).
- Patterns: Your Synced patterns and template parts can be managed here.
You will also see an icon of a magnifying glass. Click on it to access the Command Palette.
Below is an overview of the different sections in the Site Editor.
The Site Editor workspace
The Site editor loads the home page of your site (based on what you have set in the Reading Settings) to start editing.
The top menu in the Site editor includes the following options:

- The site icon (or the W icon, if no site icon is set for the site): Return to the dashboard or switch to the other section of the Site Editor: Navigation, Styles, Pages, Templates, or Patterns. If you choose to return to the dashboard, it will prompt you to save the changes or leave the Site editor without saving the changes.
- The + Block inserter button: Add a new block, block pattern, Media, or synced pattern (if the site has synched patterns) to the Site editor.
- Tools: Switch between editing a block and selecting a block. Choose the Select tool (or press the
Escapekey on your keyboard) to select individual blocks. Once a block is selected, press theEnterkey on your keyboard to return to editing.

- Undo: Undo the most recent action taken.
- Redo: Redo an action you reversed using the Undo button.
- List View: See a list of all of the blocks that are on the page and easily navigate between the blocks on your page. This is useful for seeing the page’s structure and editing, moving, and removing blocks.
- Command Palette: Click here to access all your site’s content, templates, and patterns quickly, as well as invoking other actions (settings, new page, etc).
- Save: Save the changes you made in the Site editor.
- When you click the Save button, you will get a list of all the synced patterns, navigation menus, templates and template parts where you have made changes.
- You can choose to save all or just some of them.
- Note that some changes (like changes to the Header and Footer templates) will apply to all pages of your site that use those templates, and not just the page you were working on.
- Settings: Show or hide the Template and Block Settings sidebar menu.
- Styles: Browse style variations available for the theme you have, set the typography, color palettes, and layout for the entire site, or customize the appearance of specific blocks for the whole site.
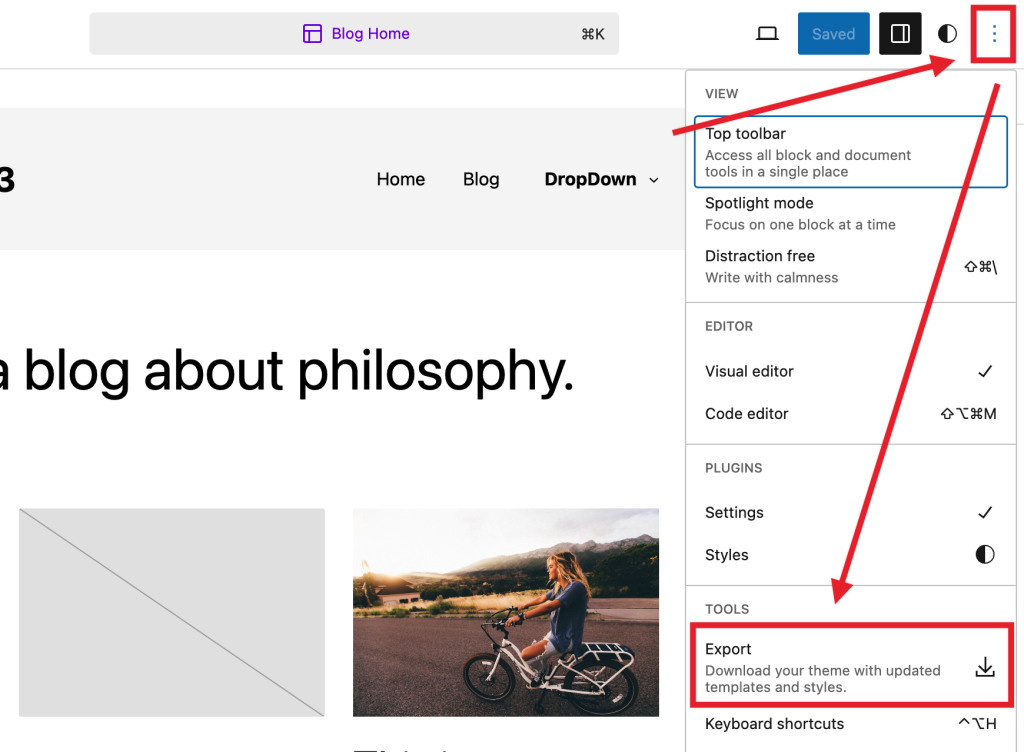
- More Options: Click the three vertical dots icon to open additional settings and tools.

View top toolbar: Display or hide the top toolbar in the editor. When you enable this option, block toolbars are pinned to the top of the WordPress block editor (right under the top toolbar) instead of appearing directly above the block.

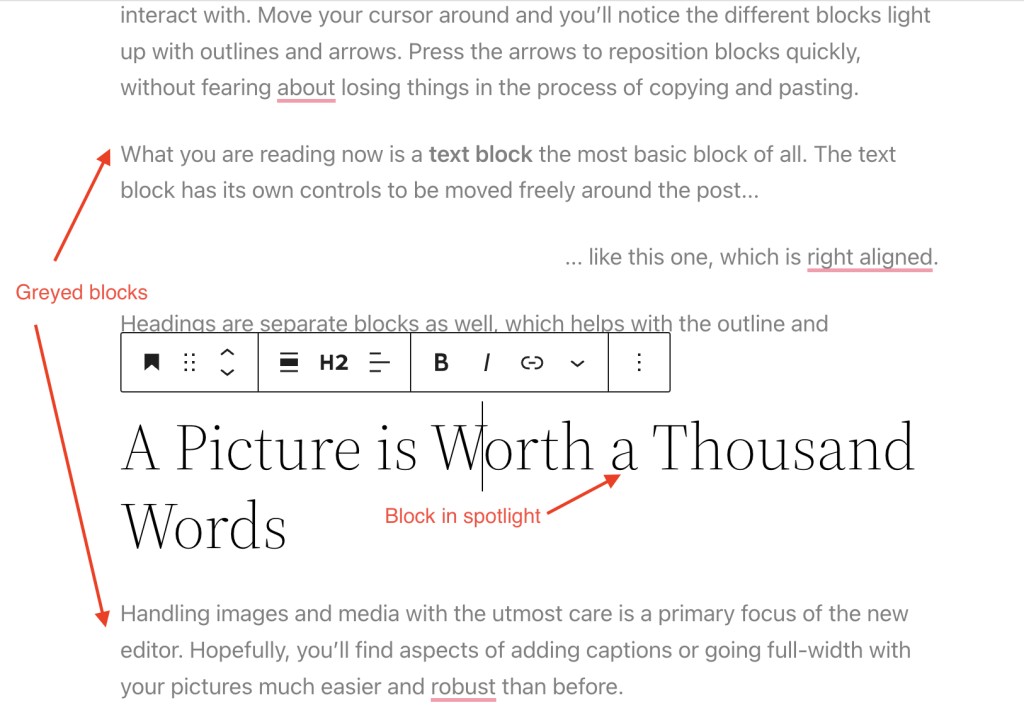
Spotlight mode: All blocks are greyed out except for the one you’re working on so that you can focus on a single block at a time.
Distraction Free: When this options is activated, all non-essential parts of the UI will be hidden to provide a more immersive editing experience.
Editor: By default, you will be in the Visual editor. Switch to the Code editor to view the entire page in HTML code editor.
Plugins: Here, you can switch between Settings and Styles in the Site editor Sidebar.
Tools: Here, you can download your theme with the updated templates and styles (Export), learn keyboard shortcuts, visit the Site Editor welcome guide, copy all blocks, or view additional support articles.
Preferences: Use the Preferences menu to customize the editing experience and change how you interact with blocks.
How to use the Site Editor
To edit the site’s styles
You can use the Site Editor to customize the styles for the entire website and for the blocks. Styles settings are available regardless of what template or template part you are editing.
- Go to Appearance > Editor.
- Click the Styles menu item or on the icon next to the block settings sidebar.
In the Styles section, you can browse the style variations available for the theme you have, change the color palettes and typography, and layout across the entire site and also change the appearance of blocks which are also applicable across the whole site.
To review your style revisions or reset the changes you made completely, click the three-dot menu icon in the right corner and select either option.
Learn more about Styles in this support article: Styles overview.
To customize the site’s layout
You can use the Site Editor to build the structure and layout of your entire site, using blocks. Eg: areas like headers, footers, and the structural appearance of your site’s posts and pages.
All blocks that are available in the WordPress Block Editor can be used in the Site Editor. A set of blocks called Theme blocks are specifically built for the Site Editor.
Examples: the Query Loop Block allows you to customize the look and feel of your post layout, the Navigation Block lets you customize the site’s navigation menu, the Site Title Block helps to customize the Site Title and more.
Check out the full list of Theme blocks.
Example – How to Customize Twenty Twenty-Three using the Site Editor
Twenty Twenty-Three supports full site editing and can be customized by Site Editor. As an usage example, let’s remove the gap at the top of the home page of Twenty Twenty-Three. To do this, remove the padding at the bottom of the header template part and the padding at the top of the content area.


First, remove bottom padding of Header Template Parts.
- From Administration Screen, Select Appearance > Editor
- Select Patterns > Template Parts > Header > Header, and click Pencil icon to edit it.
- Select the Group > Row block. Use the bottom block navigation.
- From Block Settings, Click Styles.

- Scroll down to the Padding > Bottom. Current value is 2.
- Set it to 0.
- Save the template parts.
Next, remove top padding of content area.
- Back to the Site Editor.
- Select Templates > Home, and click Pencil icon to edit it.
- Select the top Group block. Use the bottom block navigation.
- From Block Settings, Click Styles.

- Scroll down to the Padding > Top. Current value is 3.
- Set it to 0.
- Save the template.
To browse the templates and template parts
From the Site editor, you can easily browse the templates and templates parts available for your site.
- Go to Appearance > Editor to open the Site editor. This will bring you to a view where you can choose to browse your templates or template parts.
- Click on Templates to preview the list of templates available for your site.
- Click on Patterns to preview the list of template parts.
To manage the site’s templates
WordPress uses templates to create the layout and structure for specific page types on your site. The Site Editor displays the template choices that you can add to your site and lets you create custom templates using the Template Editor.
From the Appearance > Editor, you will be shown a view that includes a sidebar with your list of patterns. Inside that list, you fill also find templates and template parts. You can select any template you like from that list or click the “Manage all templates” to see them listed in a different view, where you can reset customizations, and rename or delete custom templates.
If you’re editing a template and want to return to that larger view, click the WordPress icon (or Site icon if you have set one) to open the Site Editor left navigation. This will open to the latest template you’re editing and you can use the < icon to go back to view the rest of your templates. If you go back to the list of templates, you can either preview all of your templates from there or click Mange all templates to see a list of templates available. Included in this list are those that came bundled with your block theme and the custom ones you created from the Template Editor.
Since version 6.3, the Site Editor includes a few basic settings on some site templates:
- Posts per page: Set how many posts should be listed on each page.
- Discussion: Activate or deactivate comments for new posts.
- Areas: Lists what template parts are used in that site template and allow you to jump to them cl

Learn more about Templates in this support article: Template Editor.
To manage the template parts
A Template part is a block for managing the repeating global areas of the site such as a Header, Footer, Sidebar, etc. They are primarily meant to define the site structure and can be reused. You can also create custom Template Parts that can be reused through the templates.
From the Appearance > Editor, click the Patterns option and scroll down the list with all the patterns to view the list of template parts created for your theme.
Learn more about Template Parts in this support article: Template Part.
To manage pages
Since version 6.3, it is possible to manage, edit and create pages via the Site Editor, under the “Pages” section.
Learn more about managing pages via the Site Editor in this support article: Site Editor Pages
How to return to the Dashboard
To go back to your dashboard, click the WordPress icon (or Site icon if you have set one) to open the Site Editor left navigation. Select < to take you back to your WordPress dashboard. You will be prompted to save the changes you have made in the Site Editor before leaving.

How to export templates and styles
You can export your theme with the changes you made in the Site Editor including the templates, template parts, and style settings, similar to the Tools > Export option.
- Open the Site Editor by going to Appearance > Editor.
- Select the three vertical dots icon next to your Styles settings option.
- Under Tools, select Export. This will begin the export process and you will receive a downloaded zip file of your theme with the templates and template parts included.
Useful tools when using the Site Editor
The following tools are helpful when using the Site Editor.
The Command Palette
The Command Palette offers you a quick way to navigate the content of your site and to invoke different actions such as creating new posts/pages, toggling preferences, and accessing your styles and custom CSS settings.
You can open the Command Palette in the Site View in the sidebar by clicking on the search icon and. In Edit View, the Command Palette is in the top Title Bar. You can also use the keyboard shortcut Cmd+k on Mac or Ctrl+k on Windows
Learn more about the Command Palette in this support article: Site Editor Command Palette.
List View
List View helps you navigate complex block layouts and nested block structures. You can select exactly which block you need, and get a quick overview of the block layout on the page you are working on. You can easily select multiple blocks and edit, move or group them.
Learn more about List View in this support article: List View.
Block Patterns
Block Patterns are a collection of predefined blocks that you can insert into posts and pages. You can then customize them further. WordPress comes with a set of standard Block Patterns. You can also find Block Patterns bundled with the block themes.
Learn more about Block Patterns in this support article: Block Pattern..
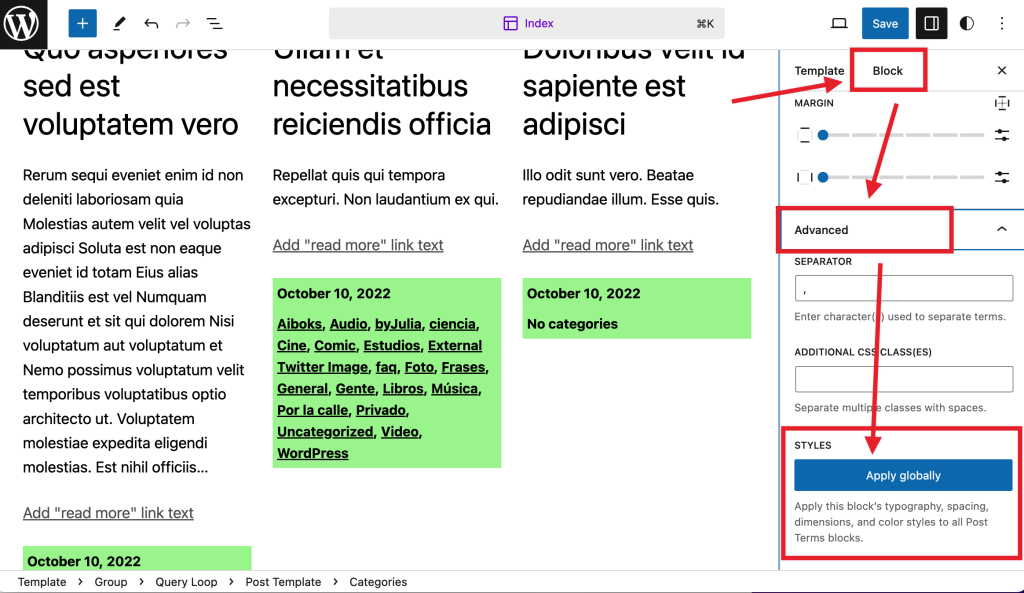
Copy and paste styles
With WordPress 6.2, a new option was added to allow you to copy and paste block styles, making it easy to reuse designs you’ve created. You can find this from the three dot menu in any block and it’s meant to be used to copy and paste between the same type of block:
Apply style changes globally
If you’re more comfortable with more advanced options when creating a design or customizing individual blocks, as of WordPress 6.2, you can take changes made to an individual block and apply it to all blocks of the same type. For example, you could apply a single design for an individual block to all blocks in your site with a new option under the Advanced section of block settings.
Resize the preview of the Site Editor
When you’re in the Site Editor, you might want to change the preview of the template or template part you’re viewing. You can do this by selecting the handles of the dark gray sidebar and moving it to your liking.
Resource Links
- Additional guide to using Site Editor
- Simple Site Design with Full Site Editing
- Intro into the Site Editor and Template Editor
Changelog
- Updated 2023-08-13
- Added example of Site Editor usage.
- Updated 2023-08-08
- Replaced “Reusable Blocks” with “Patterns”
- Updated wording & screenshots to match the new interface.
- Added a reference to the Command Palette & Site Editor Pages.
- Updated 2023-03-27
- Updated content and screenshots for 6.2
- Updated 2022-10-17
- Updated content and screenshots/video for 6.1
- Updated 2022-05-17
- Reworking the content & updating videos/screenshots for 6.0
- Created 2022-01-05
Was this article helpful? How could it be improved?
Log in to submit feedback. If you need support with something that wasn't covered by this article, please post your question in the support forums.